Saturday, February 23, 2013

In Bloom: Episode 2: Construction

In Bloom: Episode 1: Pattern Drafting

Fabric time!
Notions:
woven cotton fabric*
1/2" wide, soft stretch elastic for waist
1/4" wide, soft stretch elastic for legs
scissors
pins
needle/sewing machine
thread

optional
chalk/marker for tracing pattern to fabric
seam tape
pinking shears
safety pin for threading elastic through waist and legs

*45" wide fabric ought to work for hips/thighs up to 60" (if my other estimations are on) and use less than one yard to make a pair of bloomers. HOWEVER, those with larger measurements can always use a length of fabric to match the width of the pattern, turn the pattern vertical on the fabric, and, provided the total length of the pattern does not exceed 22", cut the two pieces side by side. When in doubt, draft your pattern before choosing fabric :)

Dig through your stash, get down to the thrift, or head to your favorite fabric store and gather your bobs 'n bits. Be sure to wash fresh-from-the-shop fabrics in the same manner you will be laundering your bloomers to remove starch, sizing, and to show the fabric how things are going to be :p Once you have it clean and dried, give it a once over with the iron to get it flat and remove any wrinkles.


Fold your fabric, right or wrong sides facing, in whichever direction works best with your pattern piece.


Place your pattern on top of your fabric, avoiding the selvage, and either pin the pattern to the fabric, then cut or, my preferred method, trace the pattern to the fabric with chalk/marker, pin all along the inside of the pattern, paying extra attention to the curves at the crotch, and cut out the two pieces of your bloomers.


You could also cut them separately, just be sure to flip the pattern to the reverse side for the second piece.


Sewing
With right sides facing each other, pin along the rise and crotch of your bloomers, placing a tighter grouping of pins around the curves.


Sew pieces together using a straight stitch, leaving a 1/2" seam allowance. Just to the outside of the stitches (in the seam allowance), follow the same line with your zigzag stitch**. Trim the excess seam allowance, minding the stitches, and clip the curves.


At this point you may want to open up the fabric, press the seam allowance to one side, and either stitch it down or cover it in seam tape so as to not have a pokey seam in your privies. **If you are sewing by hand, instead of grueling through zigzagging, you will still want to clip the curves, but could use pinking shears to trim the allowance or hold off on fray management until pressing and stitching/using seam tape.

Because they don't really lay flat, I'm having trouble rendering an image... dimensional drawing in photoshop is hard :p SO, when looking at your bloomers as such, front(s) facing left, the fabric facing up will be the left side of your bloomers.


Kind of like this...


... but not.
Moving on...

Fold the back under the front, with right sides facing each other; pin left and right side seams together. Since the back is wider than the front, the side seams will not automatically align, so just pull 'em together.


Treat the side seams as you did the rise/crotch by straight stitching with 1/2" seam allowance, then zigzagging, trimming, and pressing. You could also use seam tape here for a more finished interior.

Waistband!
Fold in the top of your bloomers 1/2" and press. Fold in again, this time 1", press. Starting ~1" from center back, with a ~3/4"seam, stitch around the waist, stopping short of the center back seam.


Grab your 1/2" elastic and wrap it around where the waistband will sit on your body. You'll want it to stretch some, but also be comfortable. Cut the elastic with a 1" overlap, poke your safety pin through one end, and thread it through the waistband channel, keeping the elastic flat.


Once all the way through, holding both ends of elastic, scrunch the fabric down to give yourself some working room, overlap the elastic 1", and stitch it together. Stretch the waist of your bloomers so that the elastic goes into the channel and stitch the gap closed.

Repeat the 1/2" and 1" folds for both legs. Starting from the inside of the legs, stitch as close to the edge of the fold as you can (almost a 1" seam), leaving a gap for the elastic, on both legs. Make a second hem using a 1/2" seam, forming a ~1/2" channel, stitching all the way around.


Get your 1/4" elastic and fit it comfortably around each thigh with a 1" overlap. Using your safety pin, thread elastic through both legs; stitch elastic together; stretch leg(s) to pop elastic into channel(s); and sew channel(s) closed.

Turn 'em right side out and you're done!

Yay! <3

Monday, February 18, 2013

In Bloom: Episode 1: Pattern Drafting

I am sure there are more sophisticated ways, replete with technical terms, to do this, but I offer you my method :) Once you have the pattern drafted, it is easily modified for full-blown, wide leg pants.

Basic Bloomers

Supplies:
news/tissue/other scrap paper for pattern
flexible measuring tape
ruler
pencil/pen/marker


Measuring:
Determine the widest point (build depending, typically hips, but sometimes upper thighs) and measure circumference. My measurement is 36" (for example purposes). Divide this number in half (18"), then into 5ths, giving 2/5 to the front and 3/5 to the back, rounding each measurement up to the nearest inch.
18" / 5 = 3.6"
3.6" x 2 = 7.2", rounded to 8" + 1" (seam allowance) = 9" front width
3.6" x 3 = 10.8", rounded to 11" + 1" (seam allowance) = 12" back width
Note the resulting numbers.

Second measuring point, depth of crotch -- important for comfort! Take your measuring tape, hold the zero mark with one hand; thread 'er between your legs; sit on a firm, flat surface; and find where the tape just sticks out from under you. For example purposes, my measurement was 8". Subtract 1" from this measurement.
8" - 1" = 7" crotch depth
Note the number.

Third and fourth measurements, front and back rise. Measure from where you want the waist of your bloomers to sit, front and back, down to where the tape truncated when measuring your depth of crotch. My measurements were 5" for the front and 7" for the back. Add 1.5" to this measurement for the waistband.
5" + 1.5" = 6.5" front rise
7" + 1.5" = 8.5" back rise
Note these numbers.

Annnd fifth measurement, inseam, measure from your crotch down to where you want your bloomers to stop. I wear mine fairly short, unless I intend to wear them as outerwear, so my inseam is 2". Add 1.5" to your inseam measurement for the hem.
2" + 1.5" = 3.5" inseam
Note this number.


Drafting:
Add together your front width, crotch depth, and back width numbers to make your total width.
9" (front w) + 7" (crotch d) + 12" (back w) = 28" total width
Add together your back rise (which is usually longer than the front, if not, use front rise instead) and inseam measurements to make your total length.
8.5" (back r) + 3.5" (inseam) = 12" total length
Draw a [rectangle] to these measurements on your [pattern paper].


At the top of this rectangle, working from left to right, mark front width, crotch depth, and back width.


From the marks on either side of the crotch, measure and mark your back rise (or longest rise) measurement and draw another line connecting the two at the bottom. Measure this bottom line to ensure the two vertical lines remain evenly spaced.


Round the two corners made in the crotch.


Cut out this section.


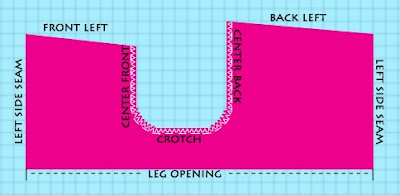
Subtract your front rise (shorter rise) from your back rise (longer rise), divide this number by 2; measure down from the top left and top right of your pattern and mark this measurement.
8.5" (back r) - 6.5 (front r) = 2" / 2 = 1"


On the front (or will-be shorter rise) side of the crotch, measure from the bottom of the crotch up to the length of the front rise and mark.


Draw straight lines connecting the front rise mark to the mark made on the left and the back rise to the mark made on the right.


Cut off these two sections.

Et voila! Pattern. As shown, this will make the left side of your bloomers; flip the pattern to the back and it will make the right side :)

Episode 2: Construction ... coming soon.

Friday, February 15, 2013

Your Move, Valentine

Every year, I whip up some sort of cheesiness for Valentine's. This year is no exception...


laced crotch(less) bloomers

Ehehehe, tacky-cute, non? I was practically hysterical while putting them together. Bloomers, in general, make me laugh (I'm not sure where my bloomer fixation originated, butI love making and wearing them), doing this to them was enough to send me over the edge XD

Pointless trivia: between 1800 and 1900 bloomers/drawers were commonly crotchless/split. Unfortunately (for them), minxiness was not behind the design.

Sunday, February 3, 2013

Schmooper Bowl

It has warmed up considerably -- almost seventy degrees! ... but I still want hibernation food >.> especially spicy chocolate.

Crinkle Cookies


dried Valencia orange peel + cinnamon + cayenne
cinnamon + confectioners sugar
confectioners sugar


3/4 c coconut (or other light/unflavored) oil
1-3/4 c turbinado sugar
1 c cocoa powder (the darker the tastier!)
1-1/3 c unbleached all purpose flour
1 c whole wheat flour
1 tsp baking powder
1 tsp baking soda
1/2 tsp salt
2 tbs Ener-G
3/4 c warm water
2 tsp vanilla extract
powdery stuffs for coating (not included in nutrition)
Obviously, I used the coatings listed below the picture, but I also thought about using ground ginger, masala chai spices, cocoa powder, homemade mint cocoa mix, powdered instant coffee, and curry powder... but I didn't want to clean 20,000 tiny bowls. I think they would all be delicious! The powdered sugar makes the cookies a little too sweet for my tastes, so I will skip it as a coating and not mix it with the cinnamon in the future. The orange+cinnamon+cayenne are to. die. for. If you're into that sort of thing ;)


I'm convinced chili+chocolate was discovered just for me.


In a large mixing bowl, using a hand mixer, beat together oil and sugar; add cocoa and beat again. In a separate bowl, stir together flours, baking soda, baking powder, and salt; set aside.

Measure Ener-G into blender carafe; slowly pour warm water over Ener-G; blend until foamy. Pour Ener-G mix and vanilla into cocoa mixture, beating to fully incorporate.

Begin beating flour into the cocoa mix a little at a time. About half-way through the dough will probably become too stiff for the hand mixer and the remaining will have to be mixed by hand.

Cover dough in plastic wrap and chill (at least) 6 hours.

Preheat oven to 350° Fahrenheit and lightly grease a cookie sheet. With a large, non-serrated knife, cut dough in half, re-wrap one half and stick back in the fridge. With the remaining half, cut into 32nds (divide dough in half three times -- 2 pieces to 4 pieces to 8 pieces -- then cut each of the 8 pieces into quarters) and roll each piece into a small ball.

Roll each ball into coating(s) of choice and place on cookie sheet. Bake 10-12 minutes or until tops are cracked and edges are firm to slight touch. Allow to cool on sheet a minute or so, then transfer to wire racks to cool completely. Repeat with second half of dough.

Servings: 32 | Serving Size: 2 cookies | Calories: 122.1 | Total Fat: 5.5 g | Cholesterol: 0.0 mg | Sodium: 90.7 mg | Potassium: 41.2 mg | Total Carbs: 16.3 g | Dietary Fiber: 1.5 g | Sugars: 10.6 g | Protein: 1.5 g | Vit. A: 0.0% | Vit. C: 0.0% | Calcium: 2.4% | Iron: 3.1%
Full nutrition can be found here.

K. Time to take advantage of Big Game Day and hit the stores \m/