Fabric time!
Notions:
woven cotton fabric*
1/2" wide, soft stretch elastic for waist
1/4" wide, soft stretch elastic for legs
scissors
pins
needle/sewing machine
thread
optional
chalk/marker for tracing pattern to fabric
seam tape
pinking shears
safety pin for threading elastic through waist and legs
*45" wide fabric ought to work for hips/thighs up to 60" (if my other estimations are on) and use less than one yard to make a pair of bloomers. HOWEVER, those with larger measurements can always use a length of fabric to match the width of the pattern, turn the pattern vertical on the fabric, and, provided the total length of the pattern does not exceed 22", cut the two pieces side by side. When in doubt, draft your pattern before choosing fabric :)
Dig through your stash, get down to the thrift, or head to your favorite fabric store and gather your bobs 'n bits. Be sure to wash fresh-from-the-shop fabrics in the same manner you will be laundering your bloomers to remove starch, sizing, and to show the fabric how things are going to be :p Once you have it clean and dried, give it a once over with the iron to get it flat and remove any wrinkles.
Fold your fabric, right or wrong sides facing, in whichever direction works best with your pattern piece.
Place your pattern on top of your fabric, avoiding the selvage, and either pin the pattern to the fabric, then cut or, my preferred method, trace the pattern to the fabric with chalk/marker, pin all along the inside of the pattern, paying extra attention to the curves at the crotch, and cut out the two pieces of your bloomers.
You could also cut them separately, just be sure to flip the pattern to the reverse side for the second piece.
Sewing
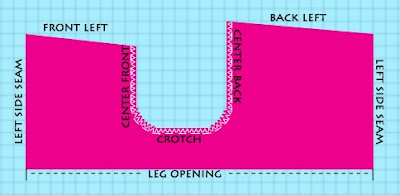
With right sides facing each other, pin along the rise and crotch of your bloomers, placing a tighter grouping of pins around the curves.
Sew pieces together using a straight stitch, leaving a 1/2" seam allowance. Just to the outside of the stitches (in the seam allowance), follow the same line with your zigzag stitch**. Trim the excess seam allowance, minding the stitches, and clip the curves.
At this point you may want to open up the fabric, press the seam allowance to one side, and either stitch it down or cover it in seam tape so as to not have a pokey seam in your privies. **If you are sewing by hand, instead of grueling through zigzagging, you will still want to clip the curves, but could use pinking shears to trim the allowance or hold off on fray management until pressing and stitching/using seam tape.
Because they don't really lay flat, I'm having trouble rendering an image... dimensional drawing in photoshop is hard :p SO, when looking at your bloomers as such, front(s) facing left, the fabric facing up will be the left side of your bloomers.
Kind of like this...
... but not.
Moving on...
Fold the back under the front, with right sides facing each other; pin left and right side seams together. Since the back is wider than the front, the side seams will not automatically align, so just pull 'em together.
Treat the side seams as you did the rise/crotch by straight stitching with 1/2" seam allowance, then zigzagging, trimming, and pressing. You could also use seam tape here for a more finished interior.
Waistband!
Fold in the top of your bloomers 1/2" and press. Fold in again, this time 1", press. Starting ~1" from center back, with a ~3/4"seam, stitch around the waist, stopping short of the center back seam.
Grab your 1/2" elastic and wrap it around where the waistband will sit on your body. You'll want it to stretch some, but also be comfortable. Cut the elastic with a 1" overlap, poke your safety pin through one end, and thread it through the waistband channel, keeping the elastic flat.
Once all the way through, holding both ends of elastic, scrunch the fabric down to give yourself some working room, overlap the elastic 1", and stitch it together. Stretch the waist of your bloomers so that the elastic goes into the channel and stitch the gap closed.
Repeat the 1/2" and 1" folds for both legs. Starting from the inside of the legs, stitch as close to the edge of the fold as you can (almost a 1" seam), leaving a gap for the elastic, on both legs. Make a second hem using a 1/2" seam, forming a ~1/2" channel, stitching all the way around.
Get your 1/4" elastic and fit it comfortably around each thigh with a 1" overlap. Using your safety pin, thread elastic through both legs; stitch elastic together; stretch leg(s) to pop elastic into channel(s); and sew channel(s) closed.
Turn 'em right side out and you're done!
Yay! <3


No comments:
Post a Comment